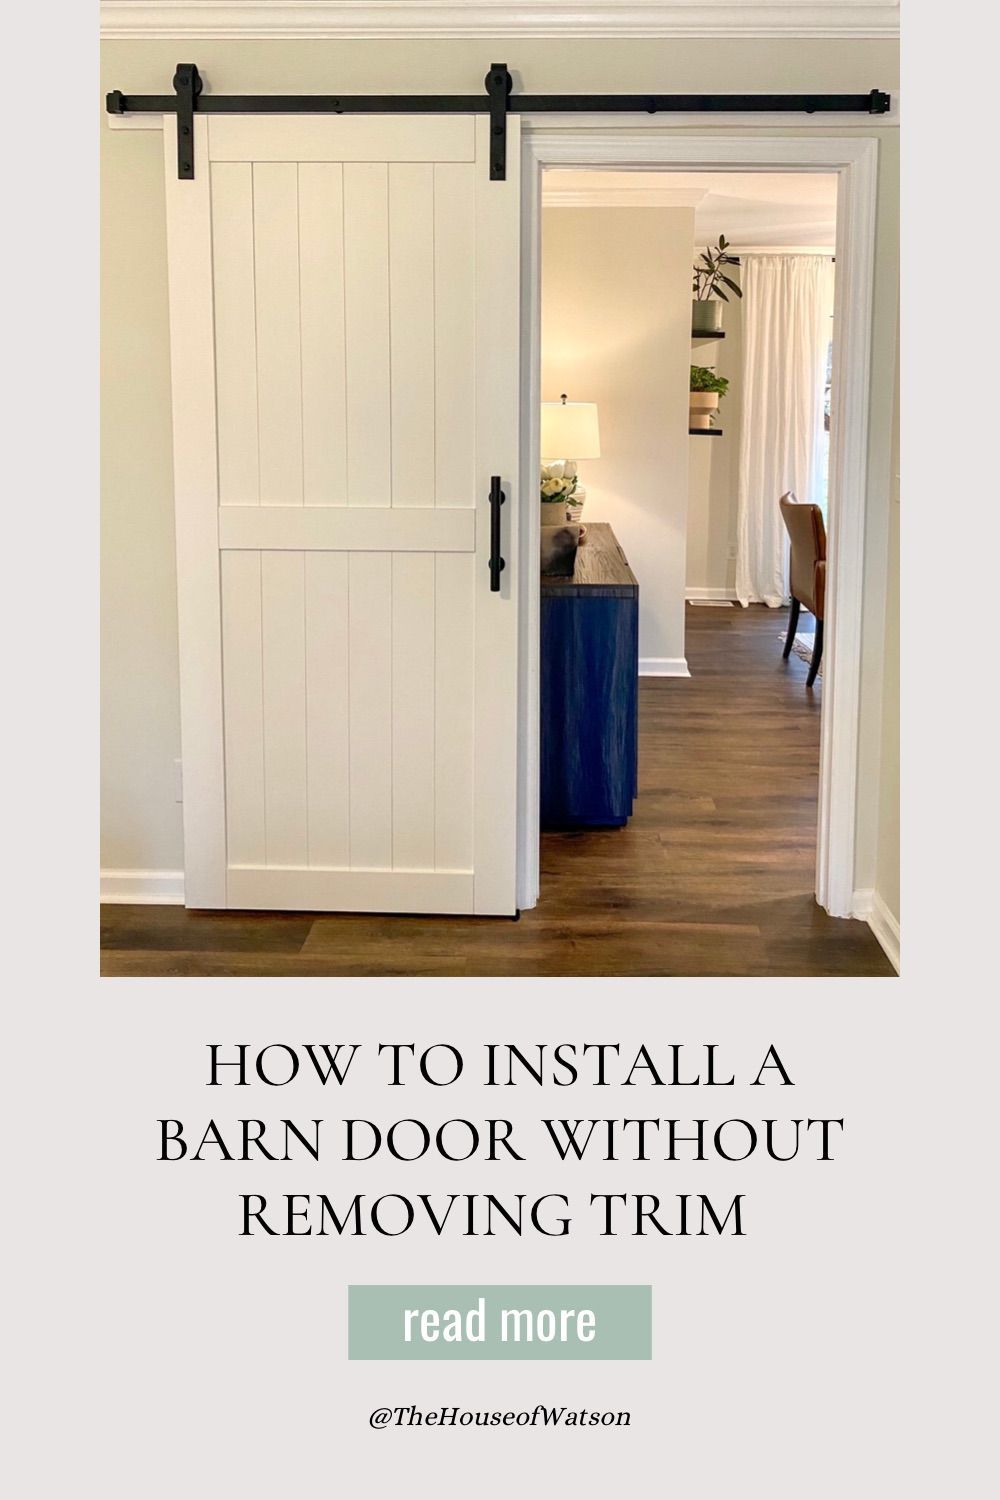
DIY Barn Door Installation Without Removing Trim
6 Easy Steps to Install a Barn Door Without Removing Trim: DIY Made Easy!
(plus a few tips to avoid mistakes I made, you'll thank me later)

Welcome, friend! Today I want to share my most recent project where my husband and I completed a DIY barn door installation without removing any trim. Yes, that's right... you can add a barn door to any room of your home while leaving your existing door trim! Leaving trim will save time, money, and plenty of stress on your part (which is also why I chose this route). If you are ready to take on a DIY barn door installation in 6 easy steps, then join me and keep reading!
Do you have a traditional single door that creates dead space or a traffic jam when opened? If so, this project will be perfect for you! The beauty of sliding doors is they only take up space on a single wall when opened or closed. This essentially frees a wall inside your room, or in the area outside. For our purposes, the sliding door freed space in our dining room bar and created a new focal point in our bedroom. Before I lose you at the thought of a barn door, let me explain how these doors are more versatile than you may initially think!
Barn doors are great for updating any doorway whether it is for a bedroom, bathroom, pantry, laundry room, or hallway. They can add interest in any space and are great for optimizing function where a traditional door is lacking. The best part about using this type of door is they can be used with any home design, not just in a farmhouse! Case in point, the barn door we installed in our primary bedroom creates a cohesive design with my organic transitional style. (if you're wondering what in the heck organic transitional is, think a mix of traditional and modern style (transitional) with a lot of textures and natural elements in the mix). In other words, it's not farmhouse. Yet, the barn door addition has elevated the design of both our primary bedroom and dining room while creating 100% more function in both spaces. I call that a win-win!
Now let's get to exactly why you found this post! In this blog you can expect a step-by-step tutorial showing how we installed our barn door in less than 4 hours from start to finish. We completed this project on a Saturday morning and to be honest it was quite simple. My husband is always my right hand man during DIY projects and he has a shop full of tools that I always raid to make everything go smoothly! I will list out the tools we used during the project as well as others that you may have on hand. Completing this barn door installation definitely requires two people for efficiency, so recruit your go-to DIY buddy and let's get started!
How to DIY a Barn Door Installation Over Existing Trim
For starters, I am going to give you a bare minimum supply list to help you complete this project. If I used a different tool during my project I will explain why and give you a link to where you can find it! I am not being paid to sponsor or promote any item in this post, these are tools we have and frequently use on DIY projects.
Supplies to install your barn door
- Barn door with hardware kit
-I highly recommend you purchase a door that has an included hardware kit because the door will come with pre-drilled holes, which makes your life SO much easier. If you are handy with a drill and willing to make your own measurements for hardware then you can purchase separately. However, I 10/10 suggest purchasing these together to decrease your time spent and stress level during this DIY project.
-This is the door and hardware kit combo we purchased. It was important to us to have a durable door rather than the cheaper, hollow core alternatives. I am extremely impressed with the quality of every aspect from this purchase, from the door itself to the hardware. It comes in a single box and you do have to assemble the door. Two person assembly took us less than 30 minutes and it was very straight forward. The door is very sturdy even with us assembling it in our living room which attests to the quality. The double sided handles even met my high standards, and I honestly expected to have to order my own hardware. Pleasantly surprised and highly satisfied!
-https://www.amazon.com/dp/B0B5ZW73QV/ref=emc_b_5_t (I would like to reiterate this door does require assembly, so if you want a pre-assembled door then do not purchase!)
- Phillips Head Screwdriver
-You can manage this project by using a screwdriver but I HIGHLY recommend using a drill instead (add extra time to your project if you go the screwdriver route!). If you don't have a drill or the budget to purchase one, ask a friend to borrow! Once you use a drill for a DIY project you will never go back to using a screwdriver. I'm speaking from experience here, it's worth the investment!
- Wrench
-The hardware kit with our door required a wrench to tighten the rollers to the door frame. You can use any adjustable wrench that you have on hand and I have linked one below.
-https://www.amazon.com/Edward-Tools-Pro-Adjustable-Wrench/dp/B0868VRMN3/ref=sr_1_4?crid=2YKOMWPEFUBDF&keywords=wrench&qid=1677428990&s=hi&sprefix=wrench%2Ctools%2C159&sr=1-4
- Level
- You can complete this project with a basic level, but we also used our laser level so I will link both. It is key during this DIY project to get your support board and track perfectly level for your door to open and close properly.
-https://www.amazon.com/CRAFTSMAN-CMHT43191-MAGNETIC-TORPEDO-LEVEL/dp/B08DJDWHQ9/ref=sr_1_5?crid=298OWIPLU3TPV&keywords=level&qid=1677429376&s=hi&sprefix=level%2Ctools%2C267&sr=1-5
- Stud finder
-https://www.amazon.com/CRAFTSMAN-Finder-4-Inch-Depth-CMHT77633/dp/B07QJD6VLL/ref=sr_1_2?crid=1SN2YZHY11IGM&keywords=craftsman+stud+finder&qid=1677431211&s=hi&sprefix=craftsman+stud+finde%2Ctools%2C223&sr=1-2
- Support board
- I bought a 1x4x8 to use as a support board for the door track. I wanted to leave our original door trim and the clearance of the track was not enough to also clear the trim. I also wanted an extra layer of safety by drilling the support board into studs to support the weight of the door. If you do not like the look of a board with the door track, make sure to measure the depth of your trim so that your door won't cause any damage! I will be adding this step into my tutorial, but skip over if you want to mount your hardware directly to the wall. We also trimmed around 8 inches off the support board because our track sits up against a wall. You can have Lowes or Home Depot make those cuts in store if you get your measurements prior to purchasing!
-Look at your door hardware's specification to see the clearance from the barn door to the wall, and compare this to the depth of your trim. We used a 1" deep board, but we could have probably used a 3/4" for a closer fit.
- Measuring tape
- Pencil to mark studs and measure for drill holes
Supplies that will make your life easier but not necessary
- Drill
-If you are going to splurge on ANY item for any DIY project, please invest in a good cordless drill! It will cut your project time and effort significantly, and also reduce stress during. Trying to use a screwdriver for even simple projects requires a lot of "elbow grease" and can wear you down. Using a drill will make sure your screws are safely in place to provide stability in your assembly. I can't stress this more, if it is in your budget then please invest in a drill. You will thank me later because it certainly changed my life during DIY projects!
-We have a battery operated Craftsman drill that I use for all of my DIY projects and furniture assembly. It's lightweight, reliable, and even has a flashlight feature to provide light while in use. If you don't have a drill (with drill bits) on hand and need suggestions for an affordable option, check out the link below!
-https://www.amazon.com/CRAFTSMAN-CMCD700C1-Cordless-Drill-Driver/dp/B07KKGXFF5/ref=sr_1_3?crid=2564QC5BMFMQF&keywords=craftsman%2Bdrill%2Bset&qid=1677430086&s=hi&sprefix=craftsman%2Bdrill%2Bset%2Ctools%2C194&sr=1-3&th=1
- You will also need screwdriver bits with the above drill. This set will allow you to replace using a screwdriver in any future projects and has both driver and drill bits! https://www.amazon.com/CRAFTSMAN-CMAF1253-53-Piece-Drill-Drive/dp/B07KHJN6PV/ref=sr_1_5?crid=33AXJOQMITMK8&keywords=craftsman+drill+bit+set&qid=1677430379&s=hi&sprefix=craftsman+drill+bit+set%2Ctools%2C124&sr=1-5
- Laser Level
-This is our laser level. It has the wall mount option which I use very often with hanging art, picture molding, and the list goes on!
-https://www.amazon.com/CRAFTSMAN-CMHT77634-10-FT-Laser-Level/dp/B07KKFHM4F/ref=sr_1_2?crid=10O7Y66FJAY66&keywords=laser+level+craftsman&qid=1677430902&s=hi&sprefix=laser+level+craftsman%2Ctools%2C118&sr=1-2
Here is a quick shot of my supplies used during this DIY Barn Door Installation
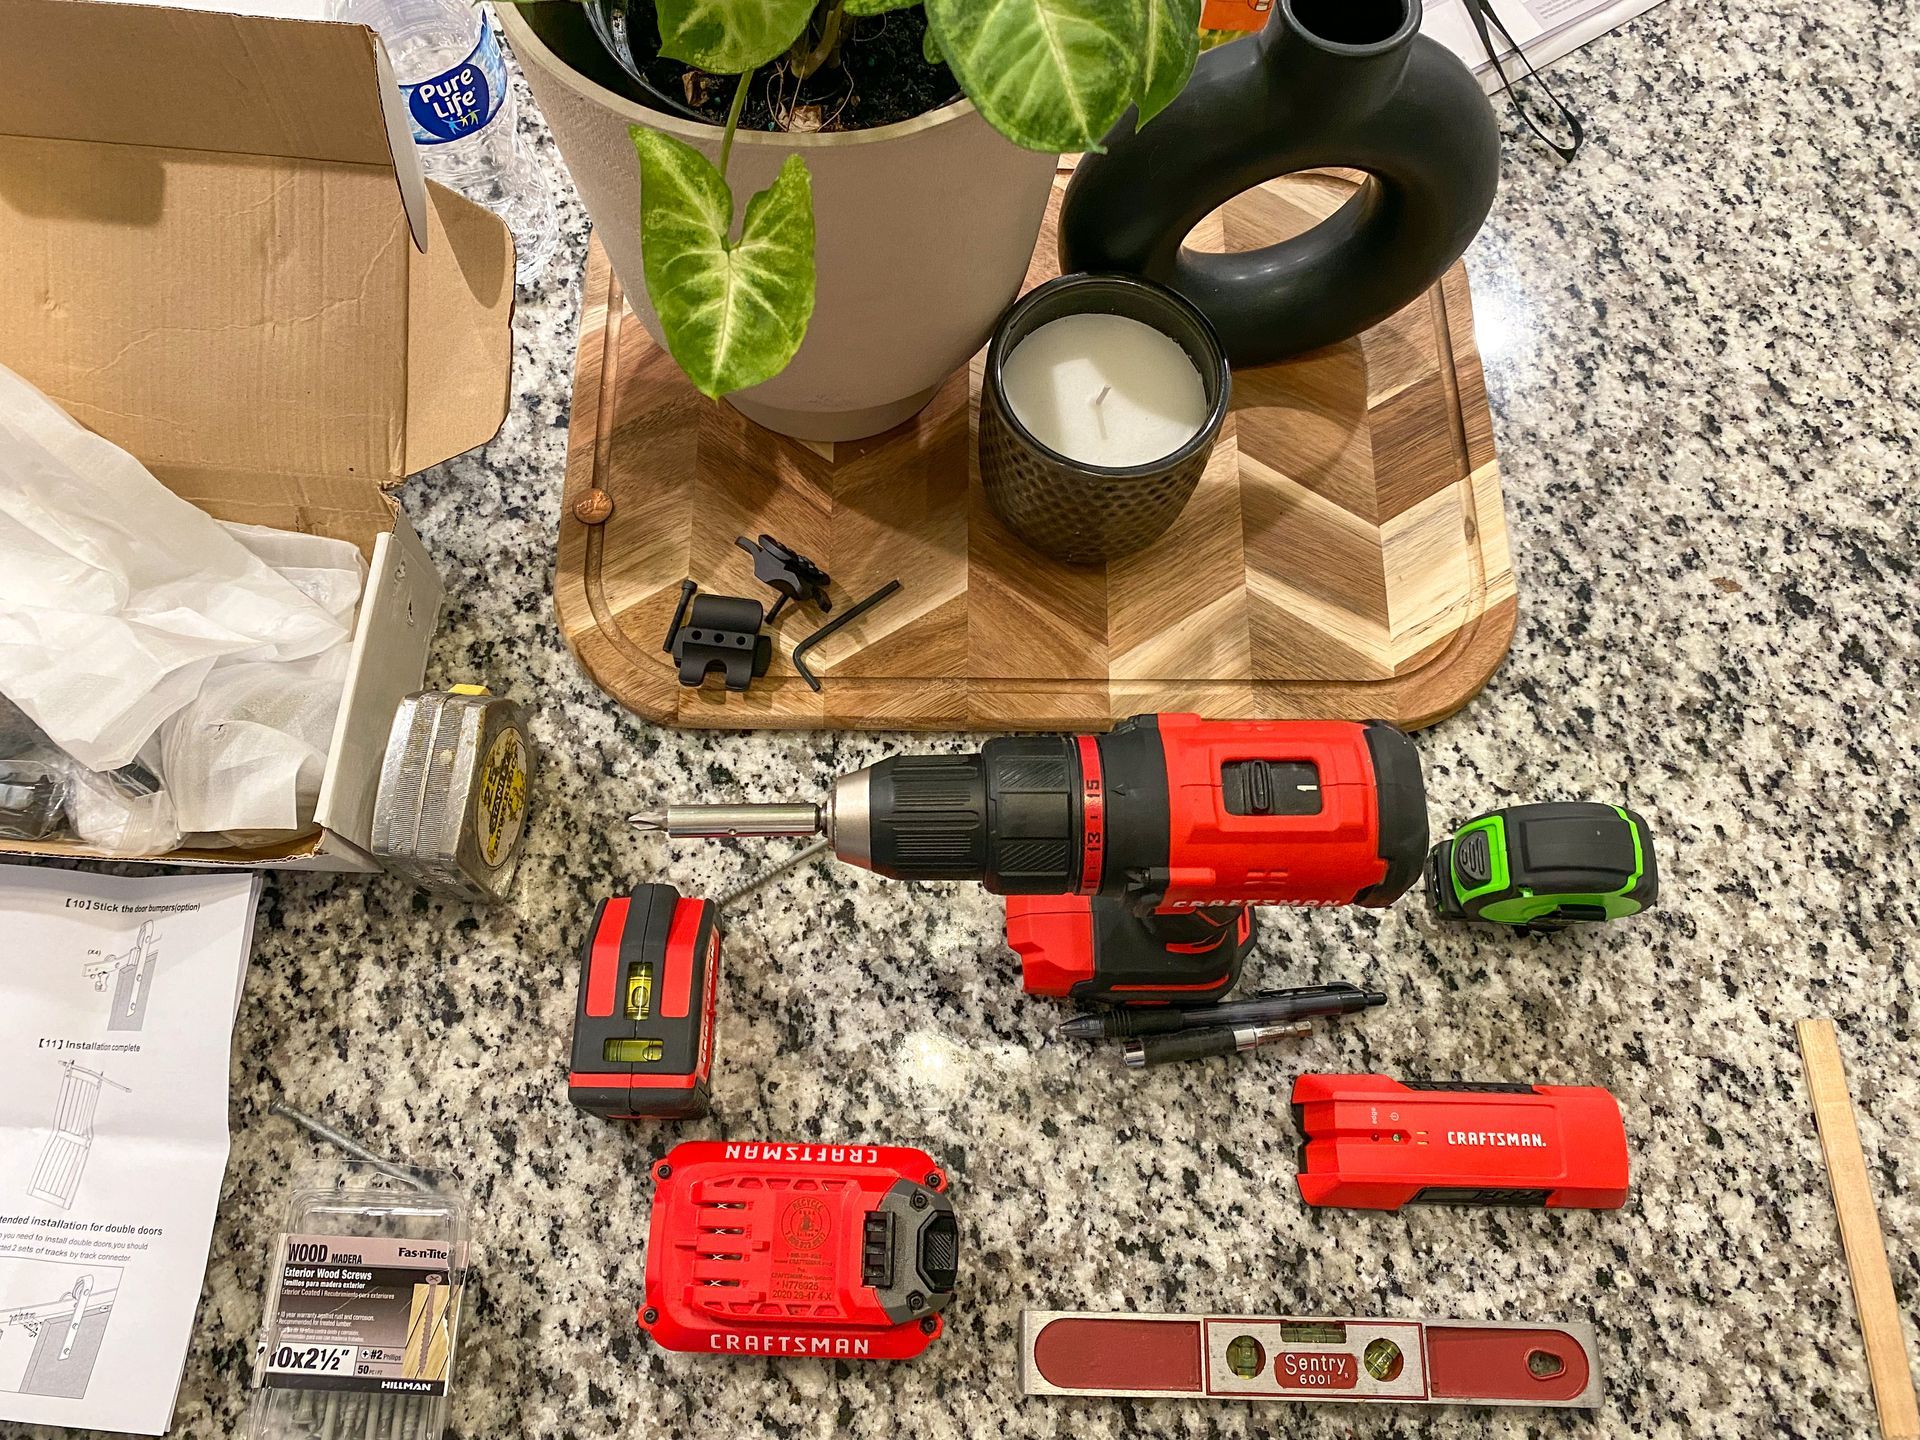
Okay, now you have a supply list! I always suggest checking your inventory and creating a shopping list for any tools you may need to complete a project before getting started. I have learned that lesson the hard way! There is nothing worse than making hardware store run (or two) in the midst of a project, so take my word on this one.
To start this tutorial, I want to show you my problematic door. My husband and I tried and tried to find a better way for our primary bedroom door to open to no avail. Every option either had the door covering a light switch, blocking another doorway, or impeding the view from the dining room into the bedroom. After much thought, and time spent scrolling on Pinterest, we decided that hanging a sliding barn door would solve all of these issues! Here is the traffic jam of a bedroom door we were dealing with:
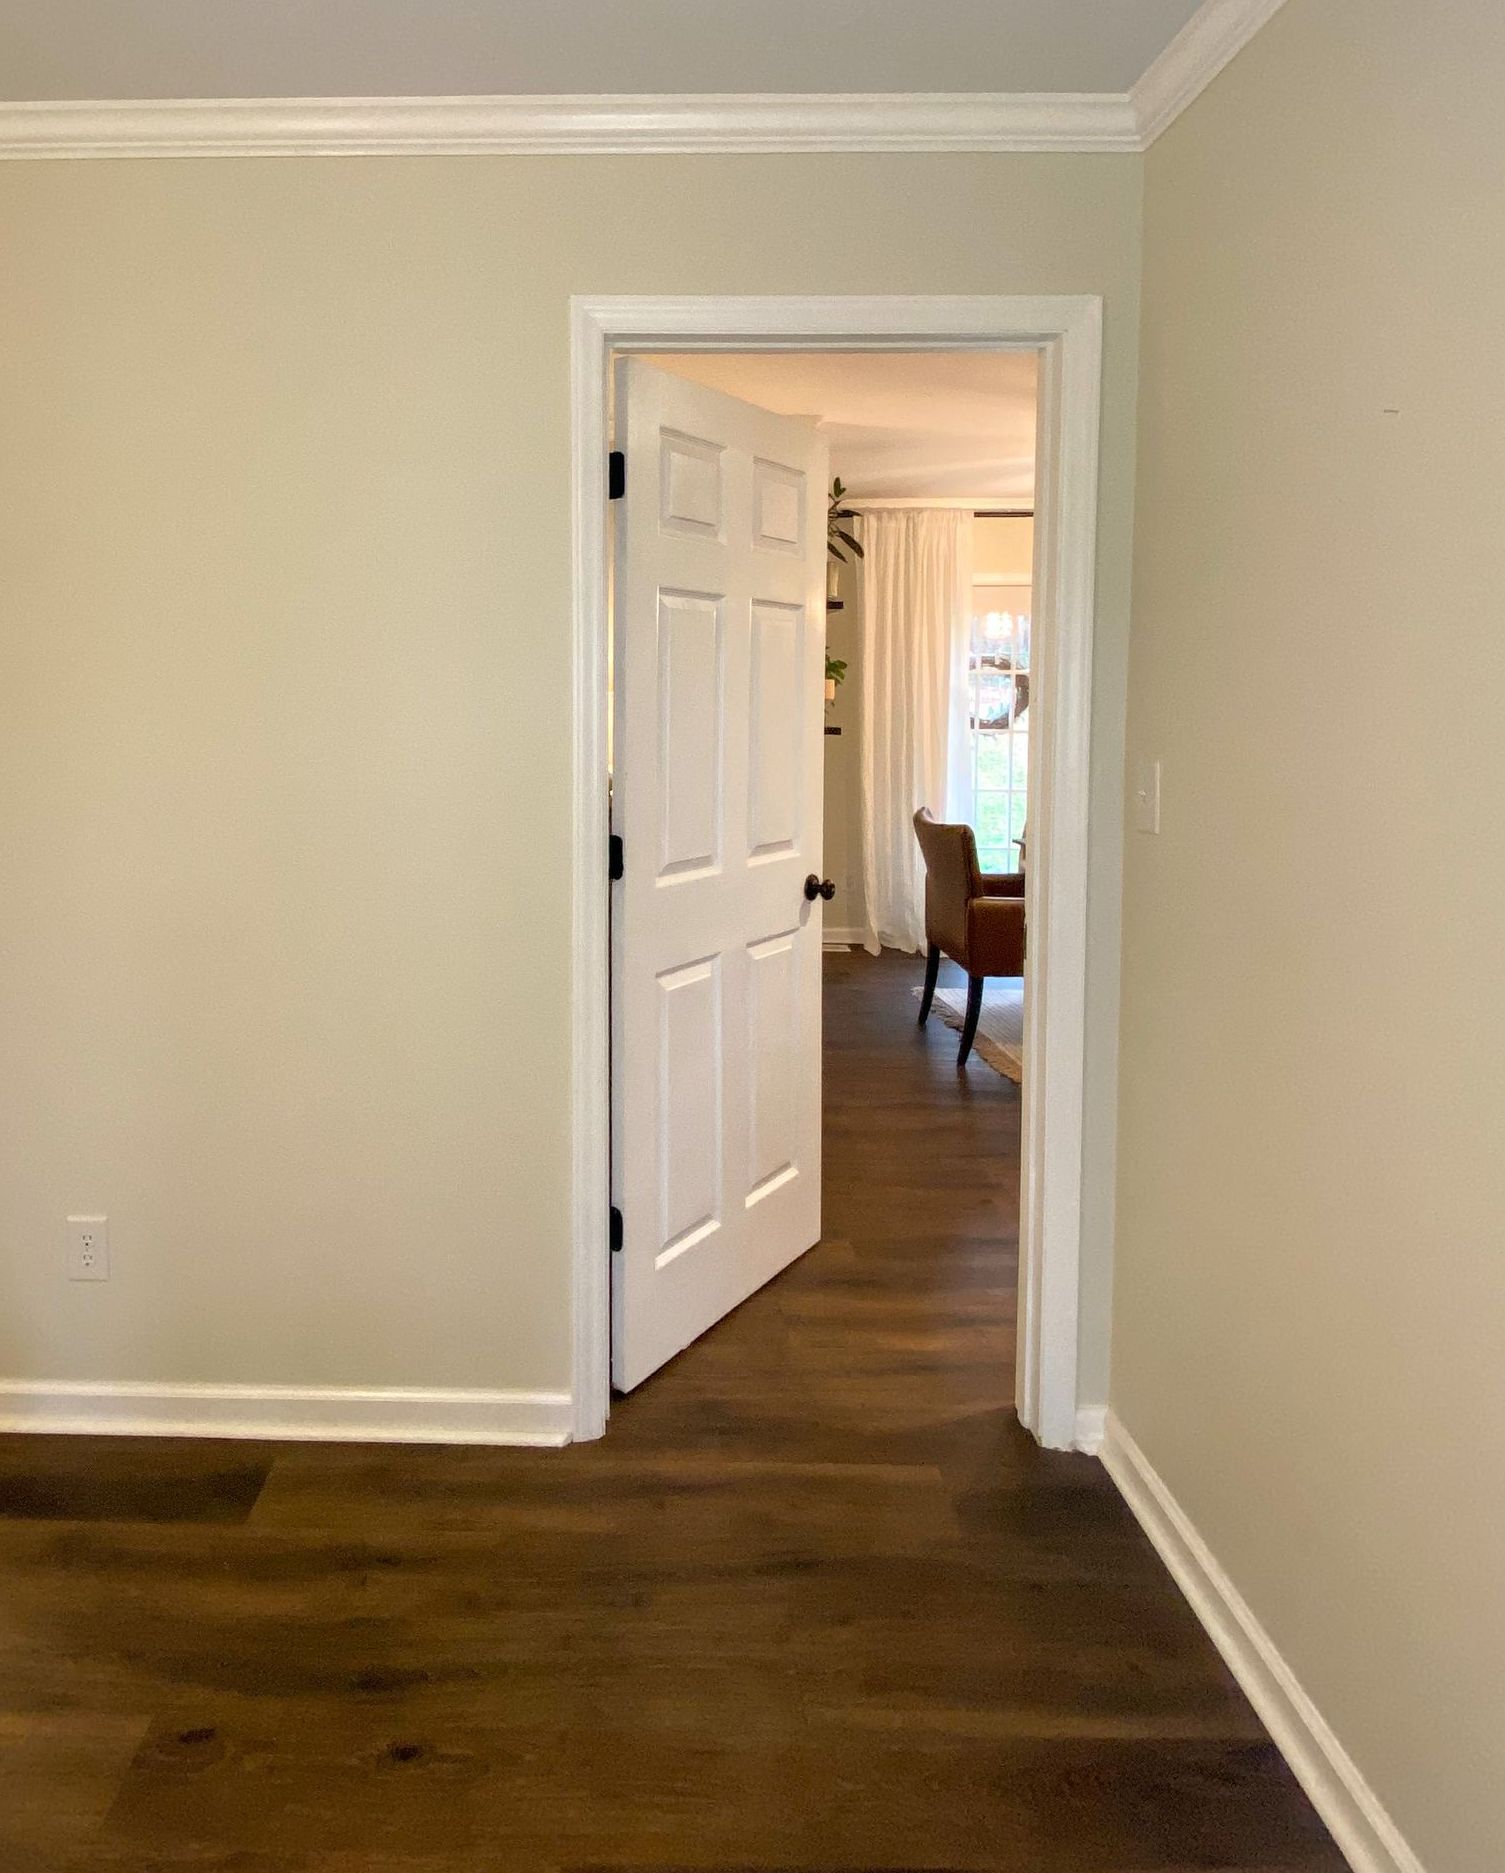

As you can see, the primary bedroom door took up valuable real estate in our dining room. We recently set up a dry bar on this open wall because we love to entertain (and my husband has started a new bourbon collection). Once we set up this bar space, it was clear this door finally had to go. I may have enticed my husband with his new bourbon display in order to get the project done, but as they say "a girls gotta do what a girls gotta do!" Luckily, my husband was fully on board with this plan so we decided to get started.
Initially, we were worried about how complex installing a barn door without removing trim may be. We knew that leaving the existing trim would save us time and effort, but we worried the install would not go as smoothly as the blogs describe. I am here to tell you this DIY project is one of the easiest we have done in our new home! I'm already planning out which other doors I can replace with sliding barn doors now.
Steps to Install a Barn Door Over Existing Trim:
1) Remove the existing door
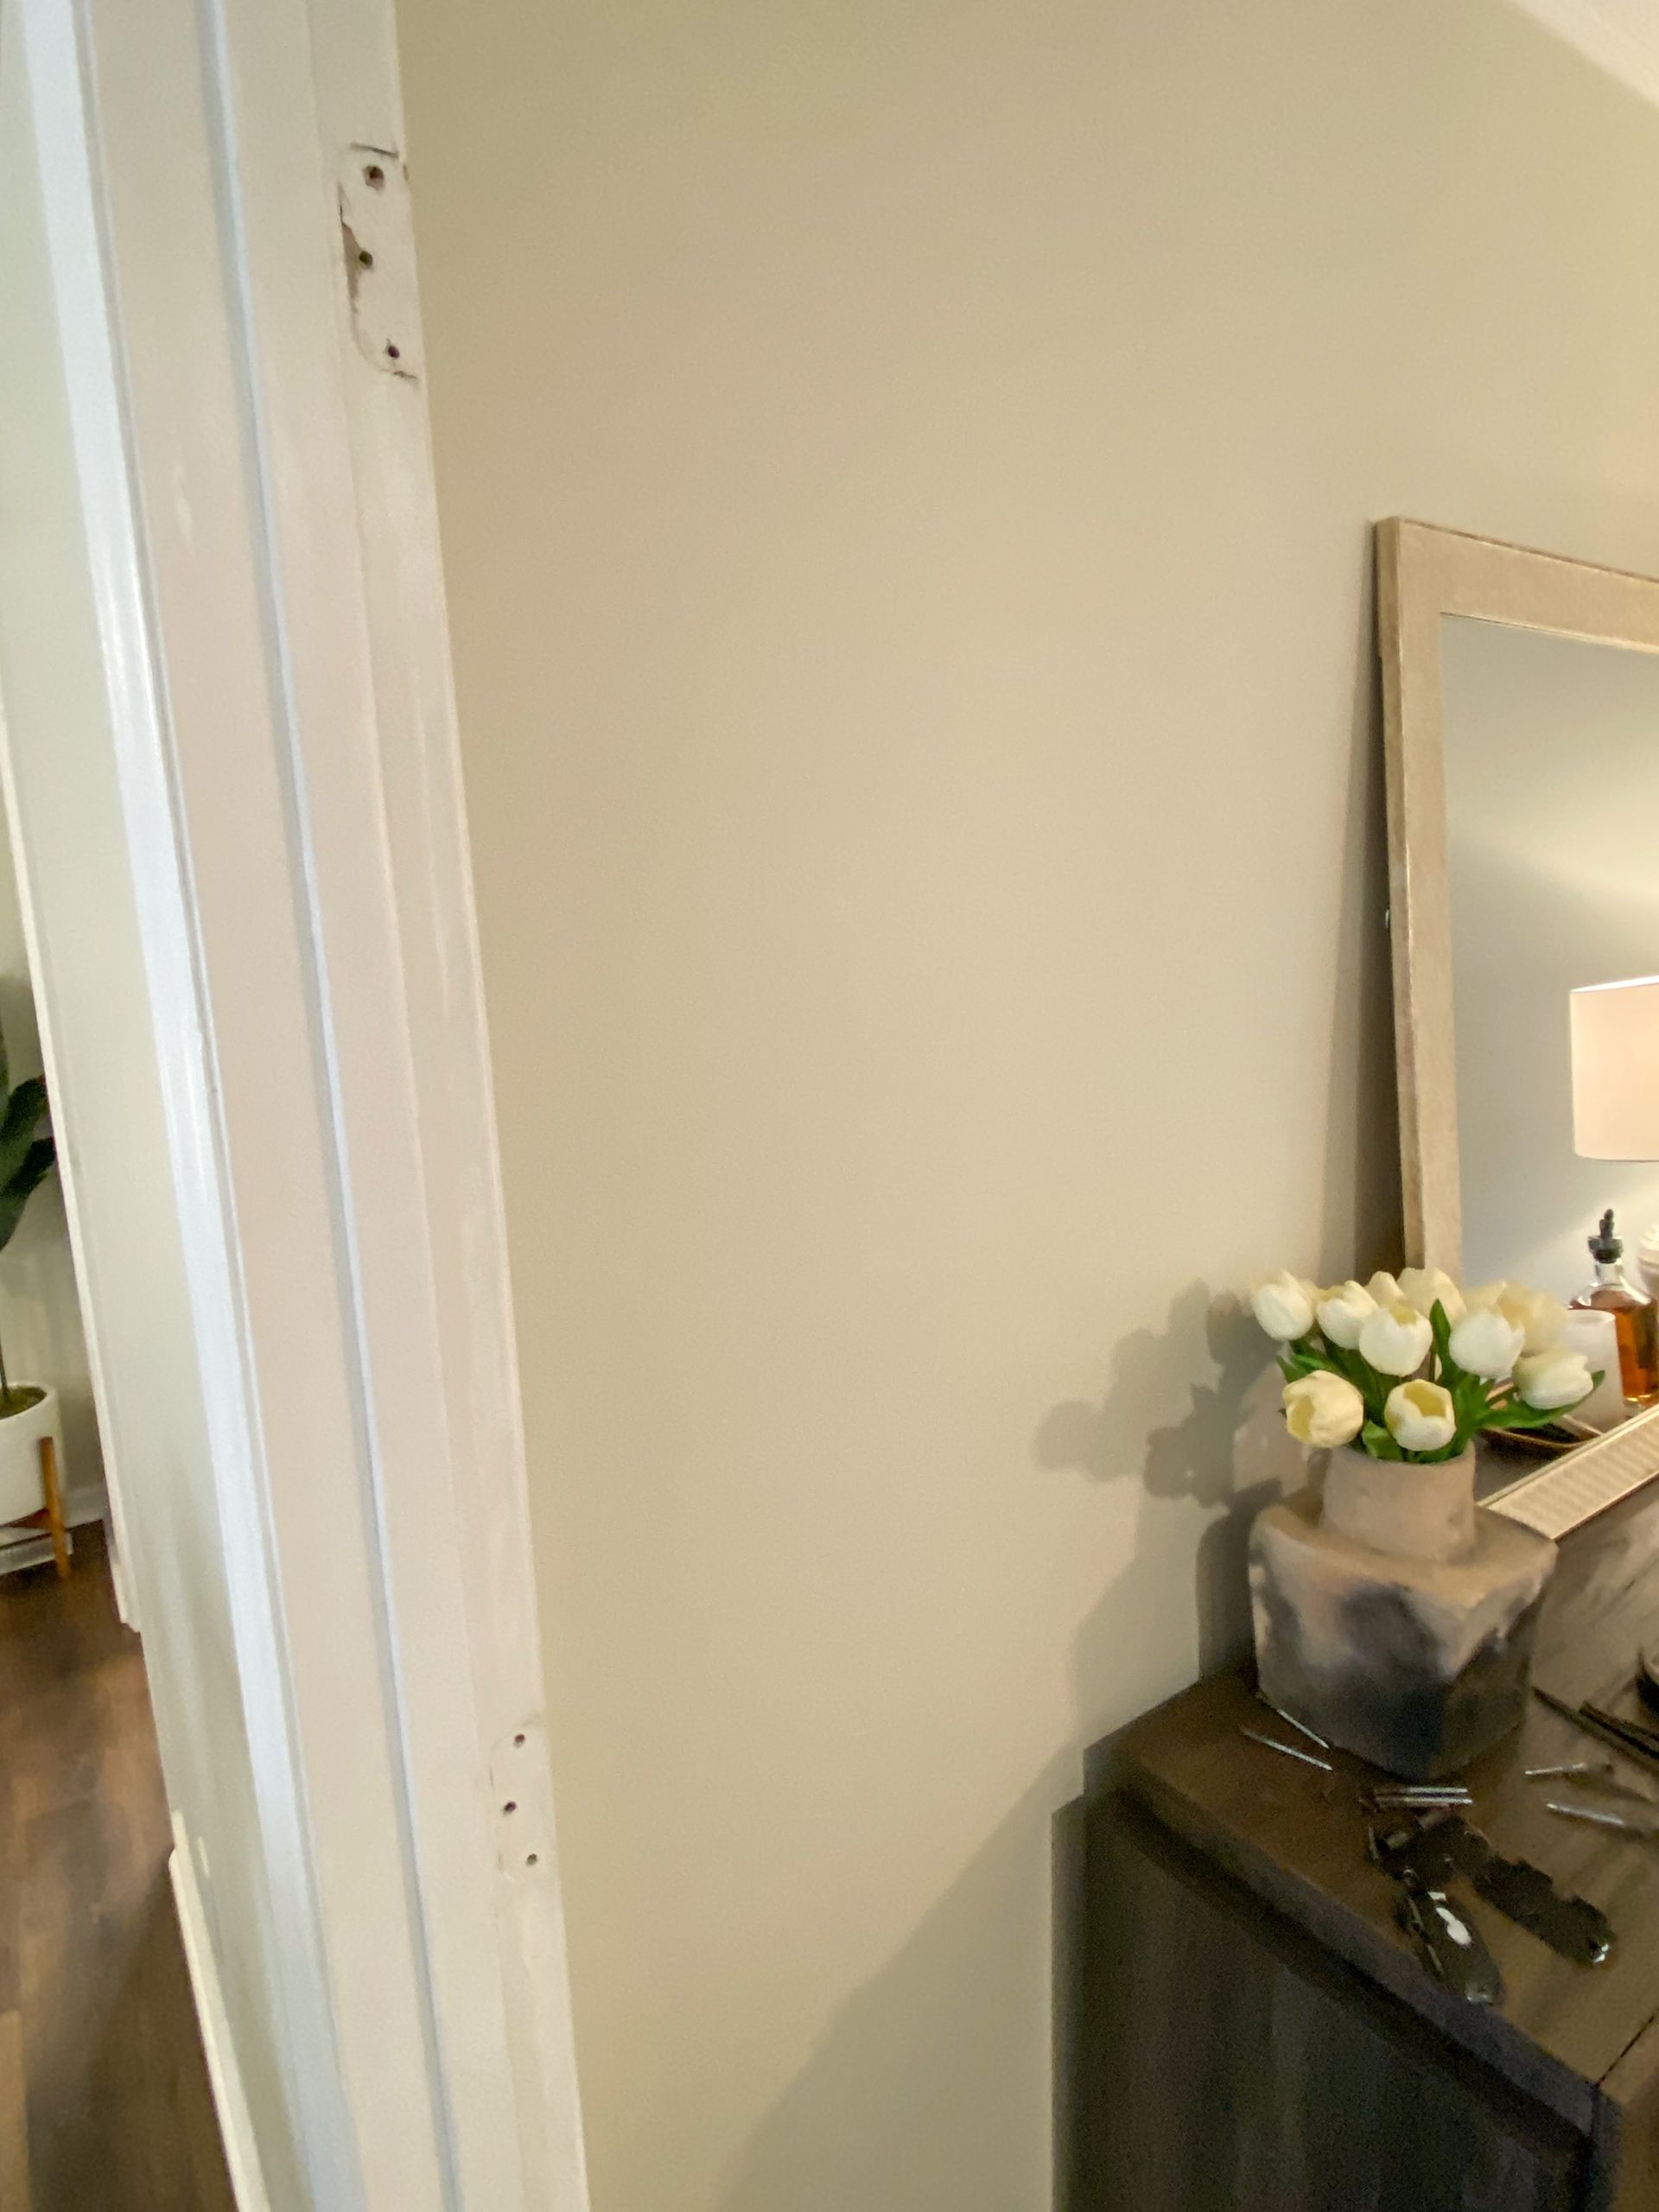
-In our project, we removed the existing traditional door and hinges with the drill I linked above. My husband used a metal punch to get the door off the hinges, then I used the drill to remove the hinges from the trim. You can also use the drill to remove the door from the trim while keeping the hinges intact. The best thing about the sliding barn door we purchased is that it can be installed over your existing trim! Skip the demo, and keep your trim intact by following this tutorial. It doesn't matter if your trim is traditional, farmhouse, colonial, etc. You can do a DIY installation with any type of trim!
-Side note: if you keep your existing trim, you will have to put a little work into repairing any damage left by the previous hinges. We plan to use spackle and touch up paint to refinish our trim and I will update this blog as this is completed!


2) Install Door Header (support board to hold track)
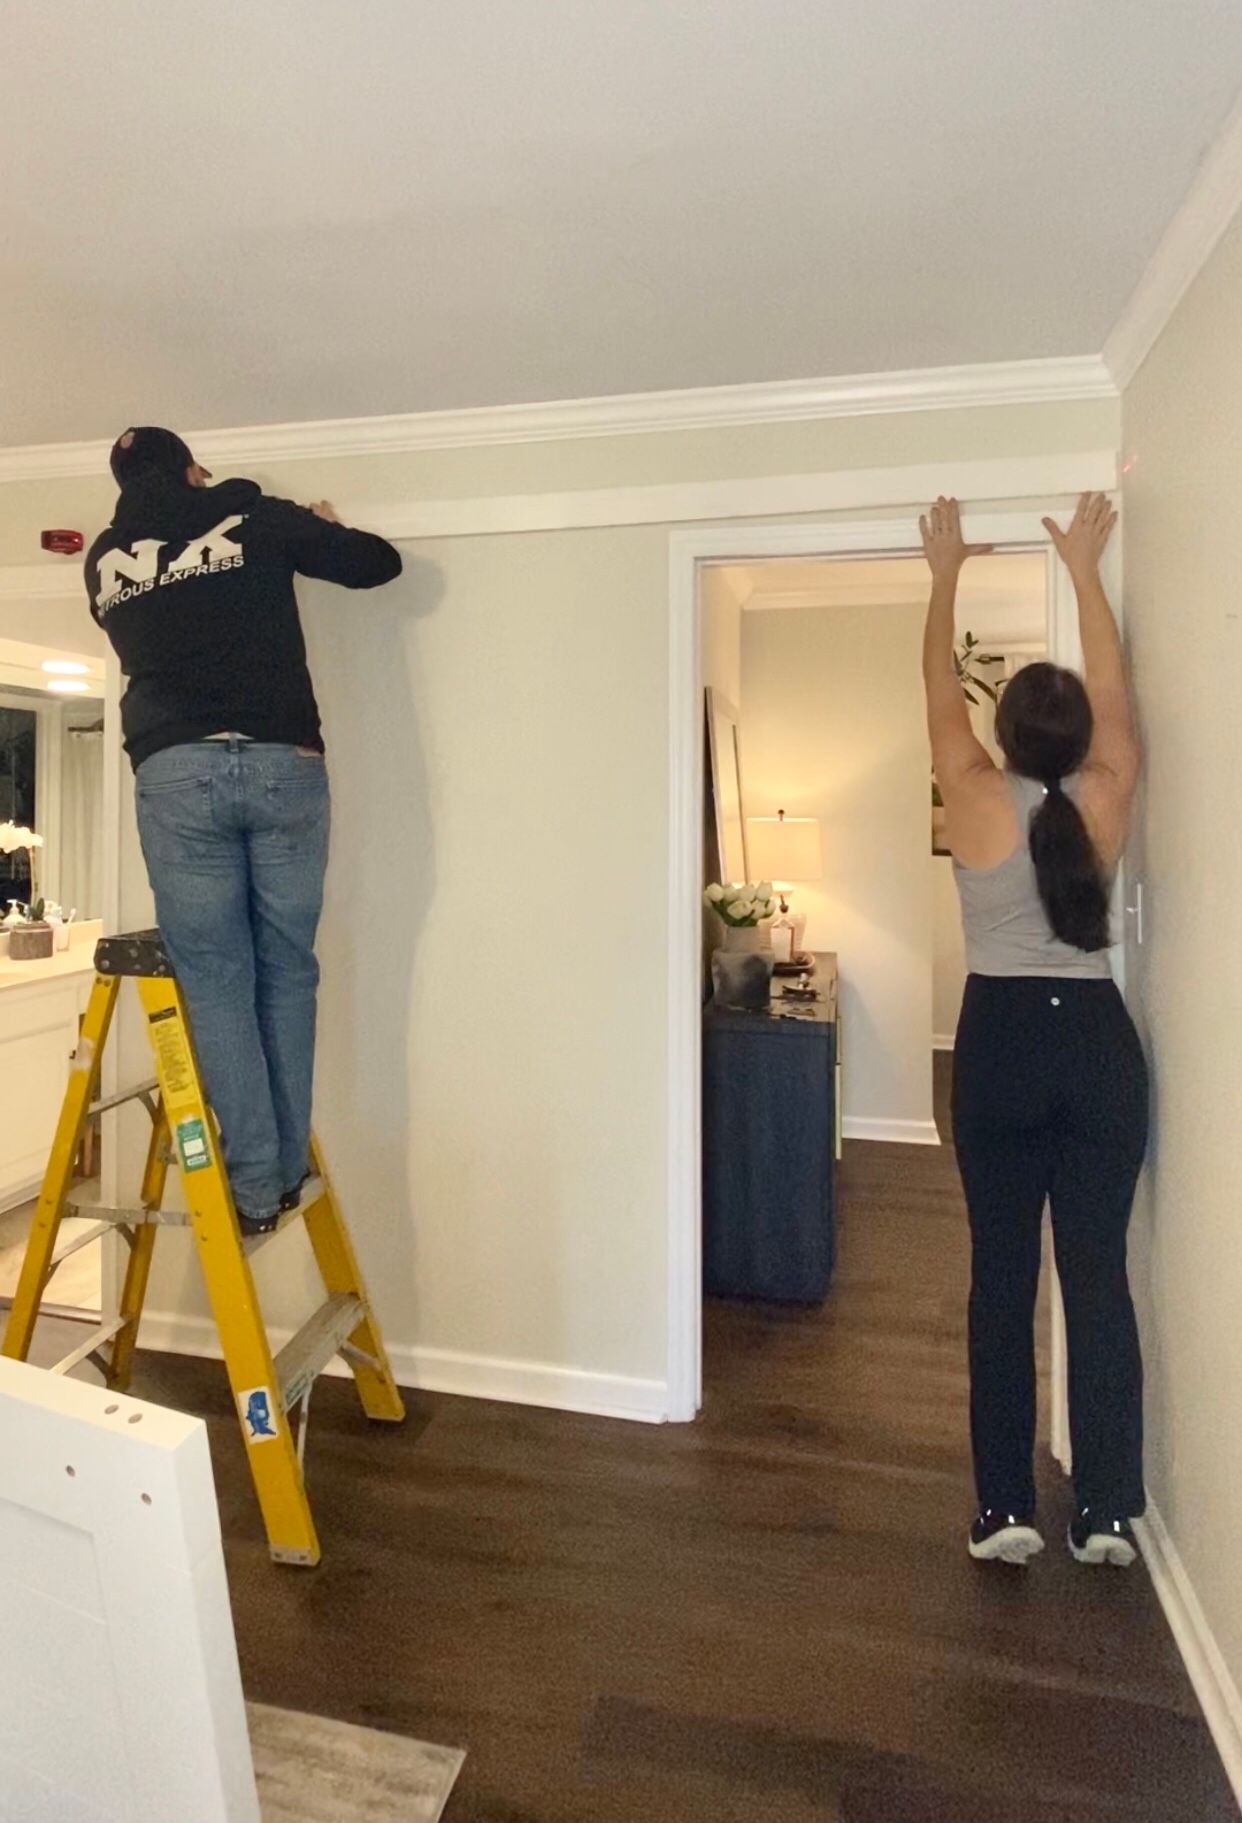
-The most strenuous part of the DIY project was this step. We took extra time to measure and mark the placement of our door header since this would be what ensures our barn door wouldn't rip out of the wall in the years to come. The support board we purchased was a 1'x4'x8' primed spruce pin fir board, and we trimmed it down to accommodate the size of our barn door track. Make sure you double check your measurements and allow an extra 1-2" on each side of your door header in addition to the track length. This step makes sure your door can open and close freely, and is very import if your barn door is close to an existing wall like ours was! If you are mounting the track directly to your wall, you can skip this step.
-We started this step by using our stud finder and a pencil to mark the studs. I highly suggest you put 2-3 screws directly into a stud for your support board. This gives you stability and reassurance for your sliding barn door! Be sure to thoroughly read the directions of your barn door hardware to see the height your track will be. We marked the wall for the recommended height of the track, and then drilled the door header to the wall. We used our laser level to mark the height our track needed to be while installing the door header.
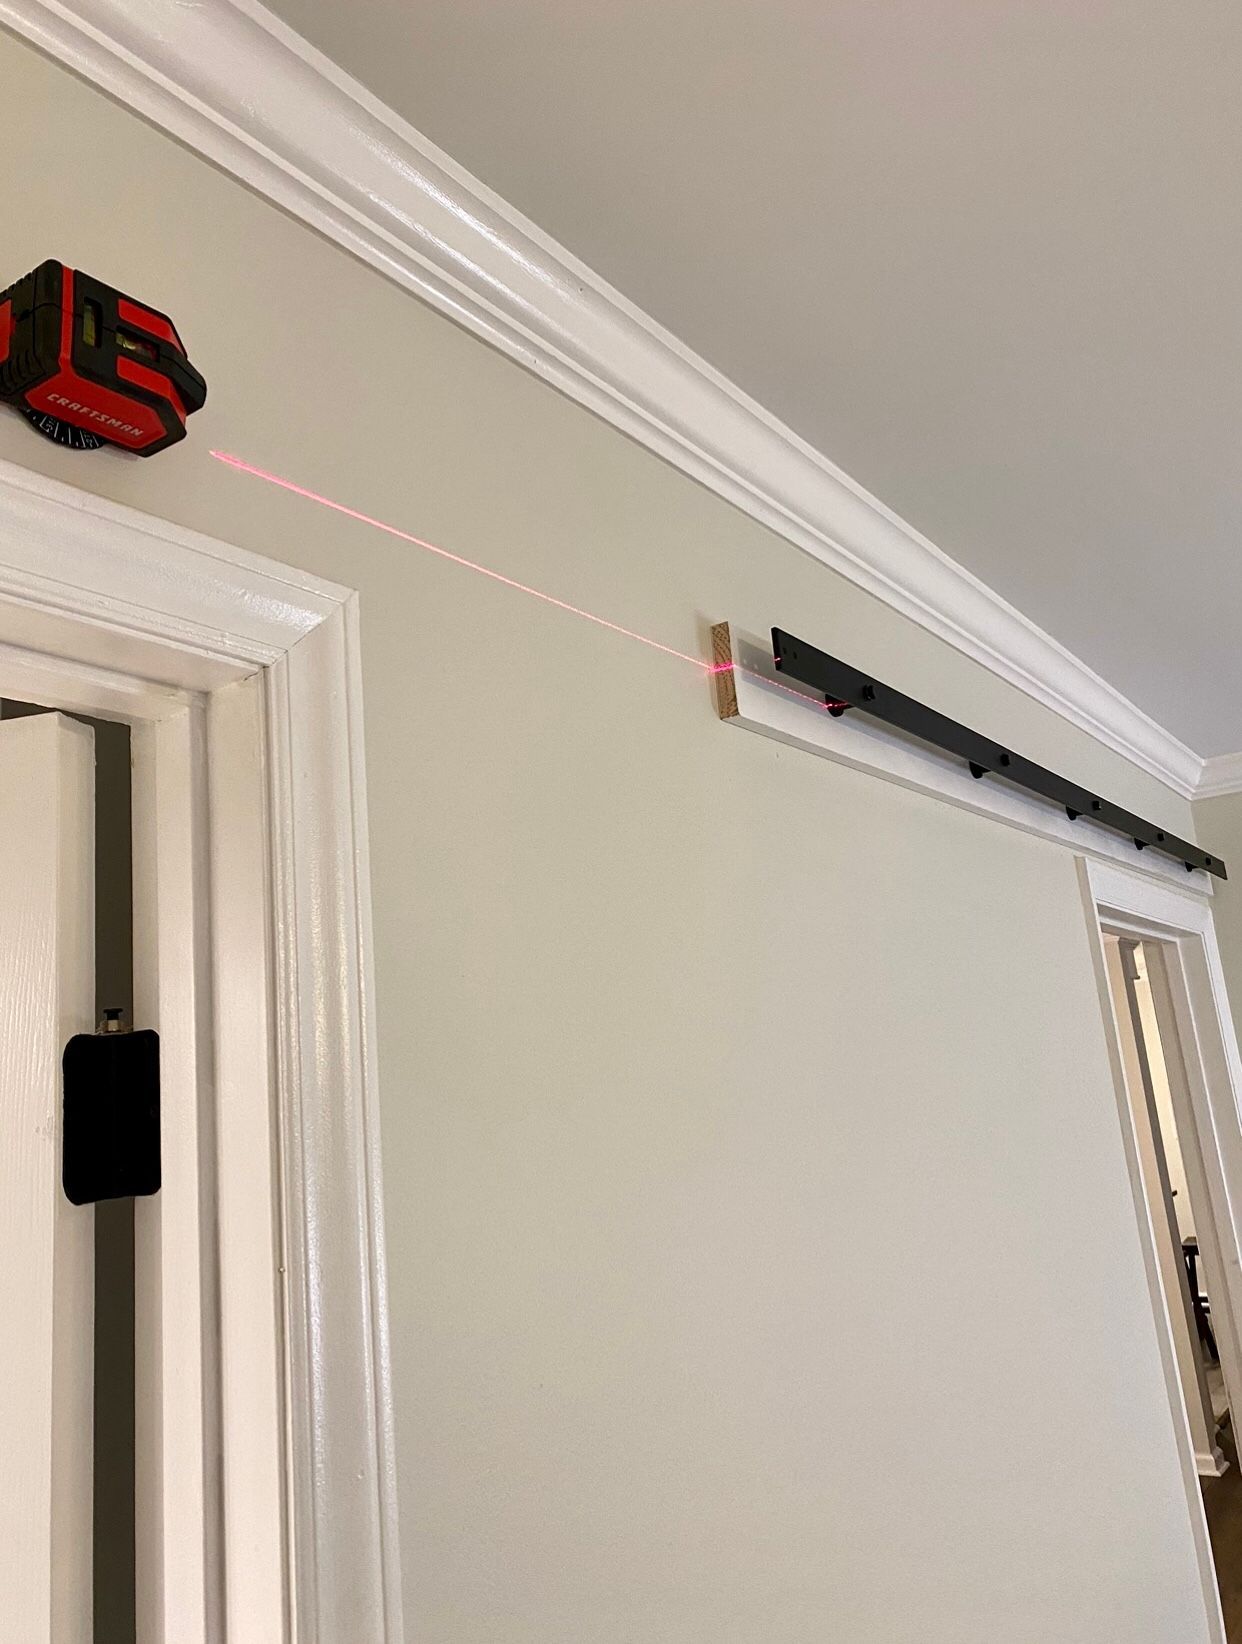
3) Install Sliding Door Track
- This step went by quickly because we already had our laser level marking the center of our support board! We double and triple checked this height was correct for the door we purchased, which I also recommend you do. If you are following each step on this tutorial then you should already know where your track should be on the door header, so go ahead and drill your track in place! You can continue using the level to make sure your track will allow the door to open and close smoothly.

4) Install Door Hardware
- Again, another bonus of purchasing your barn door combo with a hardware kit means you have everything you need AND the door has pre-drilled holes for the hardware. This was a lifesaver! We simply attached the door rollers to the barn door as directed and did not have to worry about any measurements. We had already assembled our door prior to me deciding to blog about this project so I do not have any photos of that process. I will say it took us less than 30 minutes and was very straight forward!
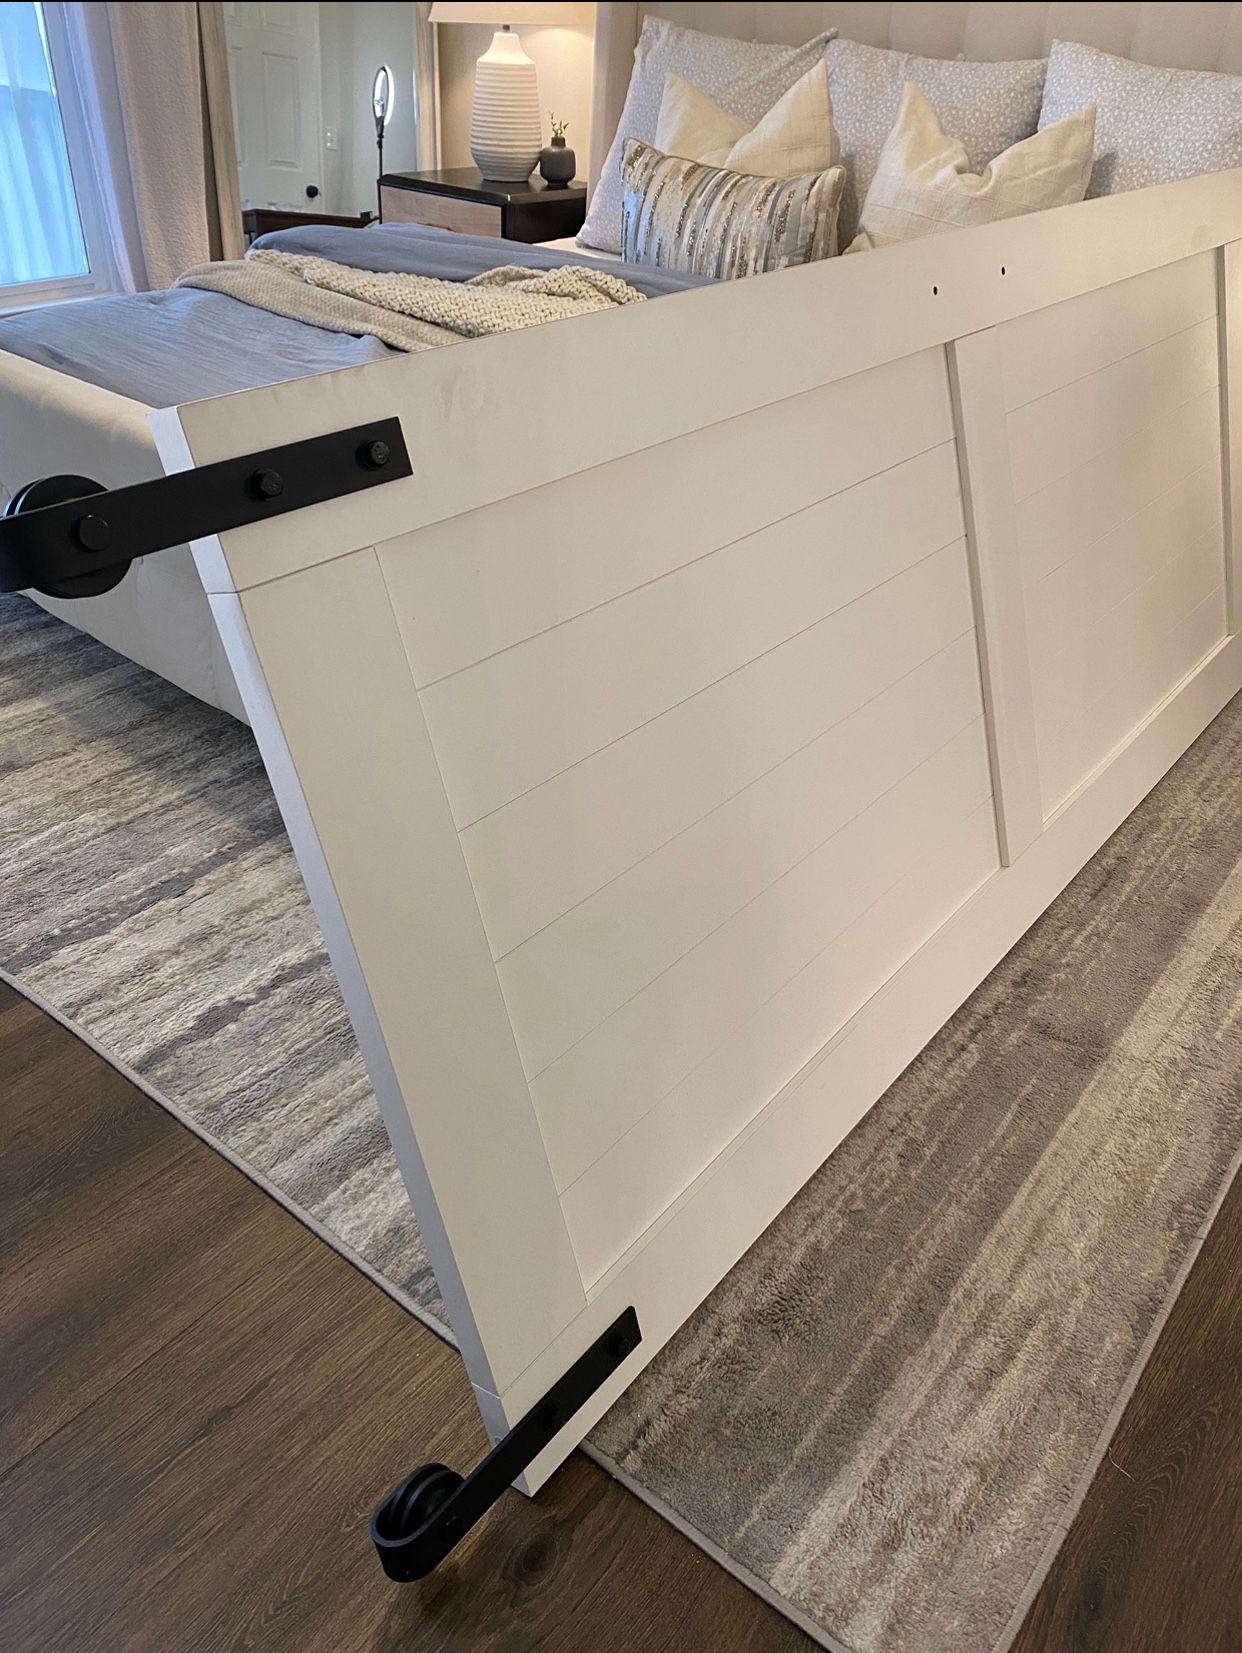
-*Pro tip: make sure you know if you want your handle on the left or right side of the door before installing the roller hardware. We accidentally put the rollers on and had the handle on the left side which did not work for our doorway. This will make more sense as you are installing and I will add a photo to explain. If you look below, the circular rollers go directly on the track. When this was hung up on our wall, it allowed the door handle to be on the right side of the door. This only applies if you have a handle on each side of your door which we did. Clear as mud? Okay!
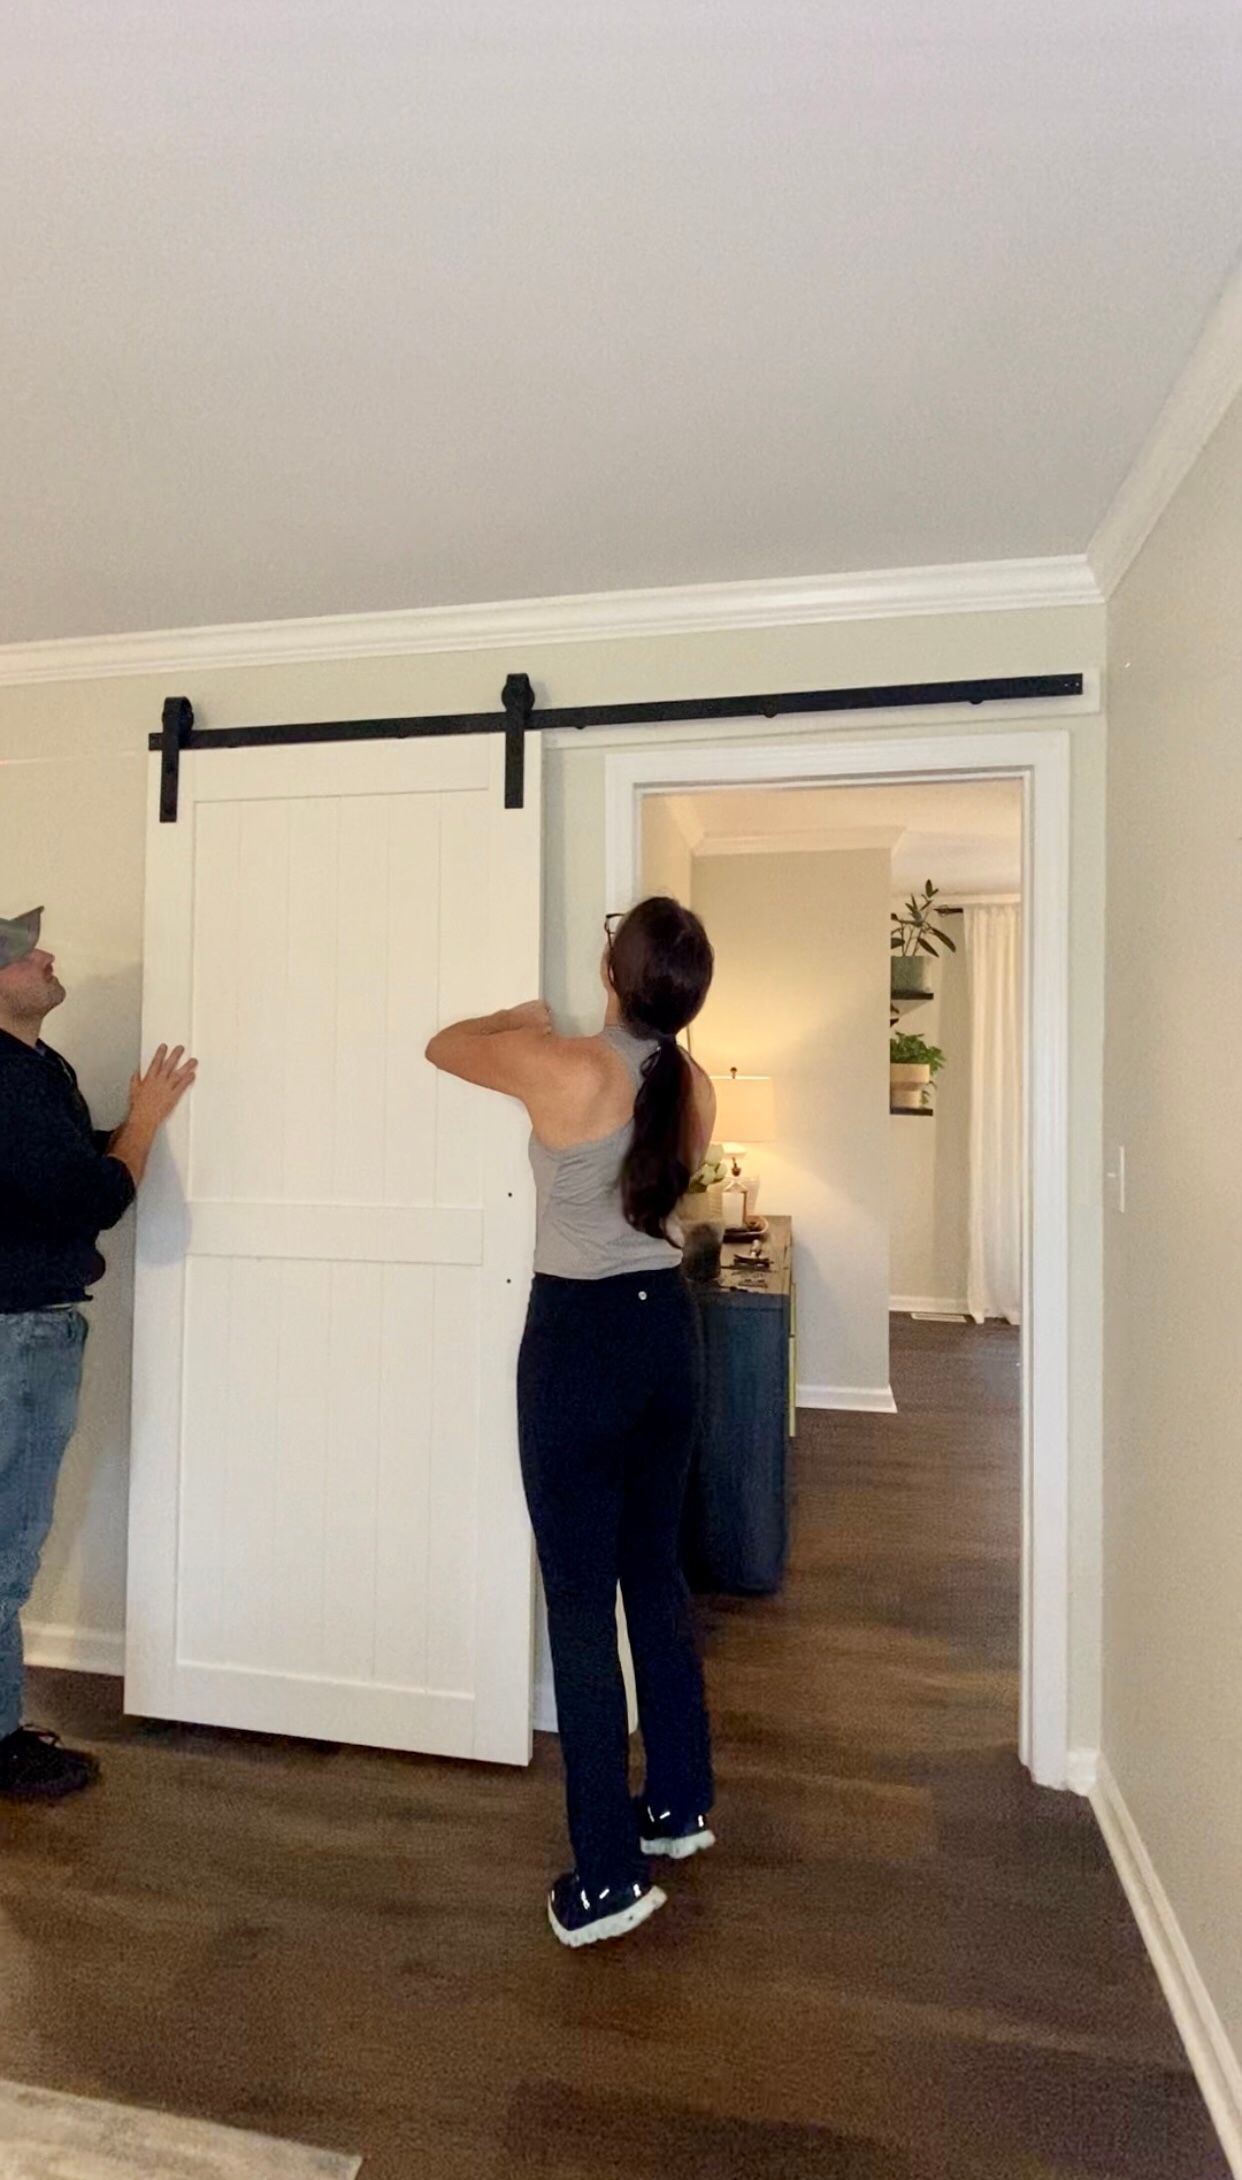
5) Fasten Door to Track
-AKA the most exciting step!! Prepare to see your hardware pay off in 3, 2, 1!
-We each took one side of the door and made sure our roller sat centered on the wall track. Then we gave it a quick open and close to make sure our measurements were correct and the door would work. IT DID! *cue mini celebratory dance* Once the door was hanging on the track, we installed door stops that were included in our kit. You put these at each end of the track to keep it from opening or closing too far. It also provides a "soft close" because the stopper is rubber, which prevents the door from slamming in either direction. We loved this feature, and it will prove especially useful with future children.
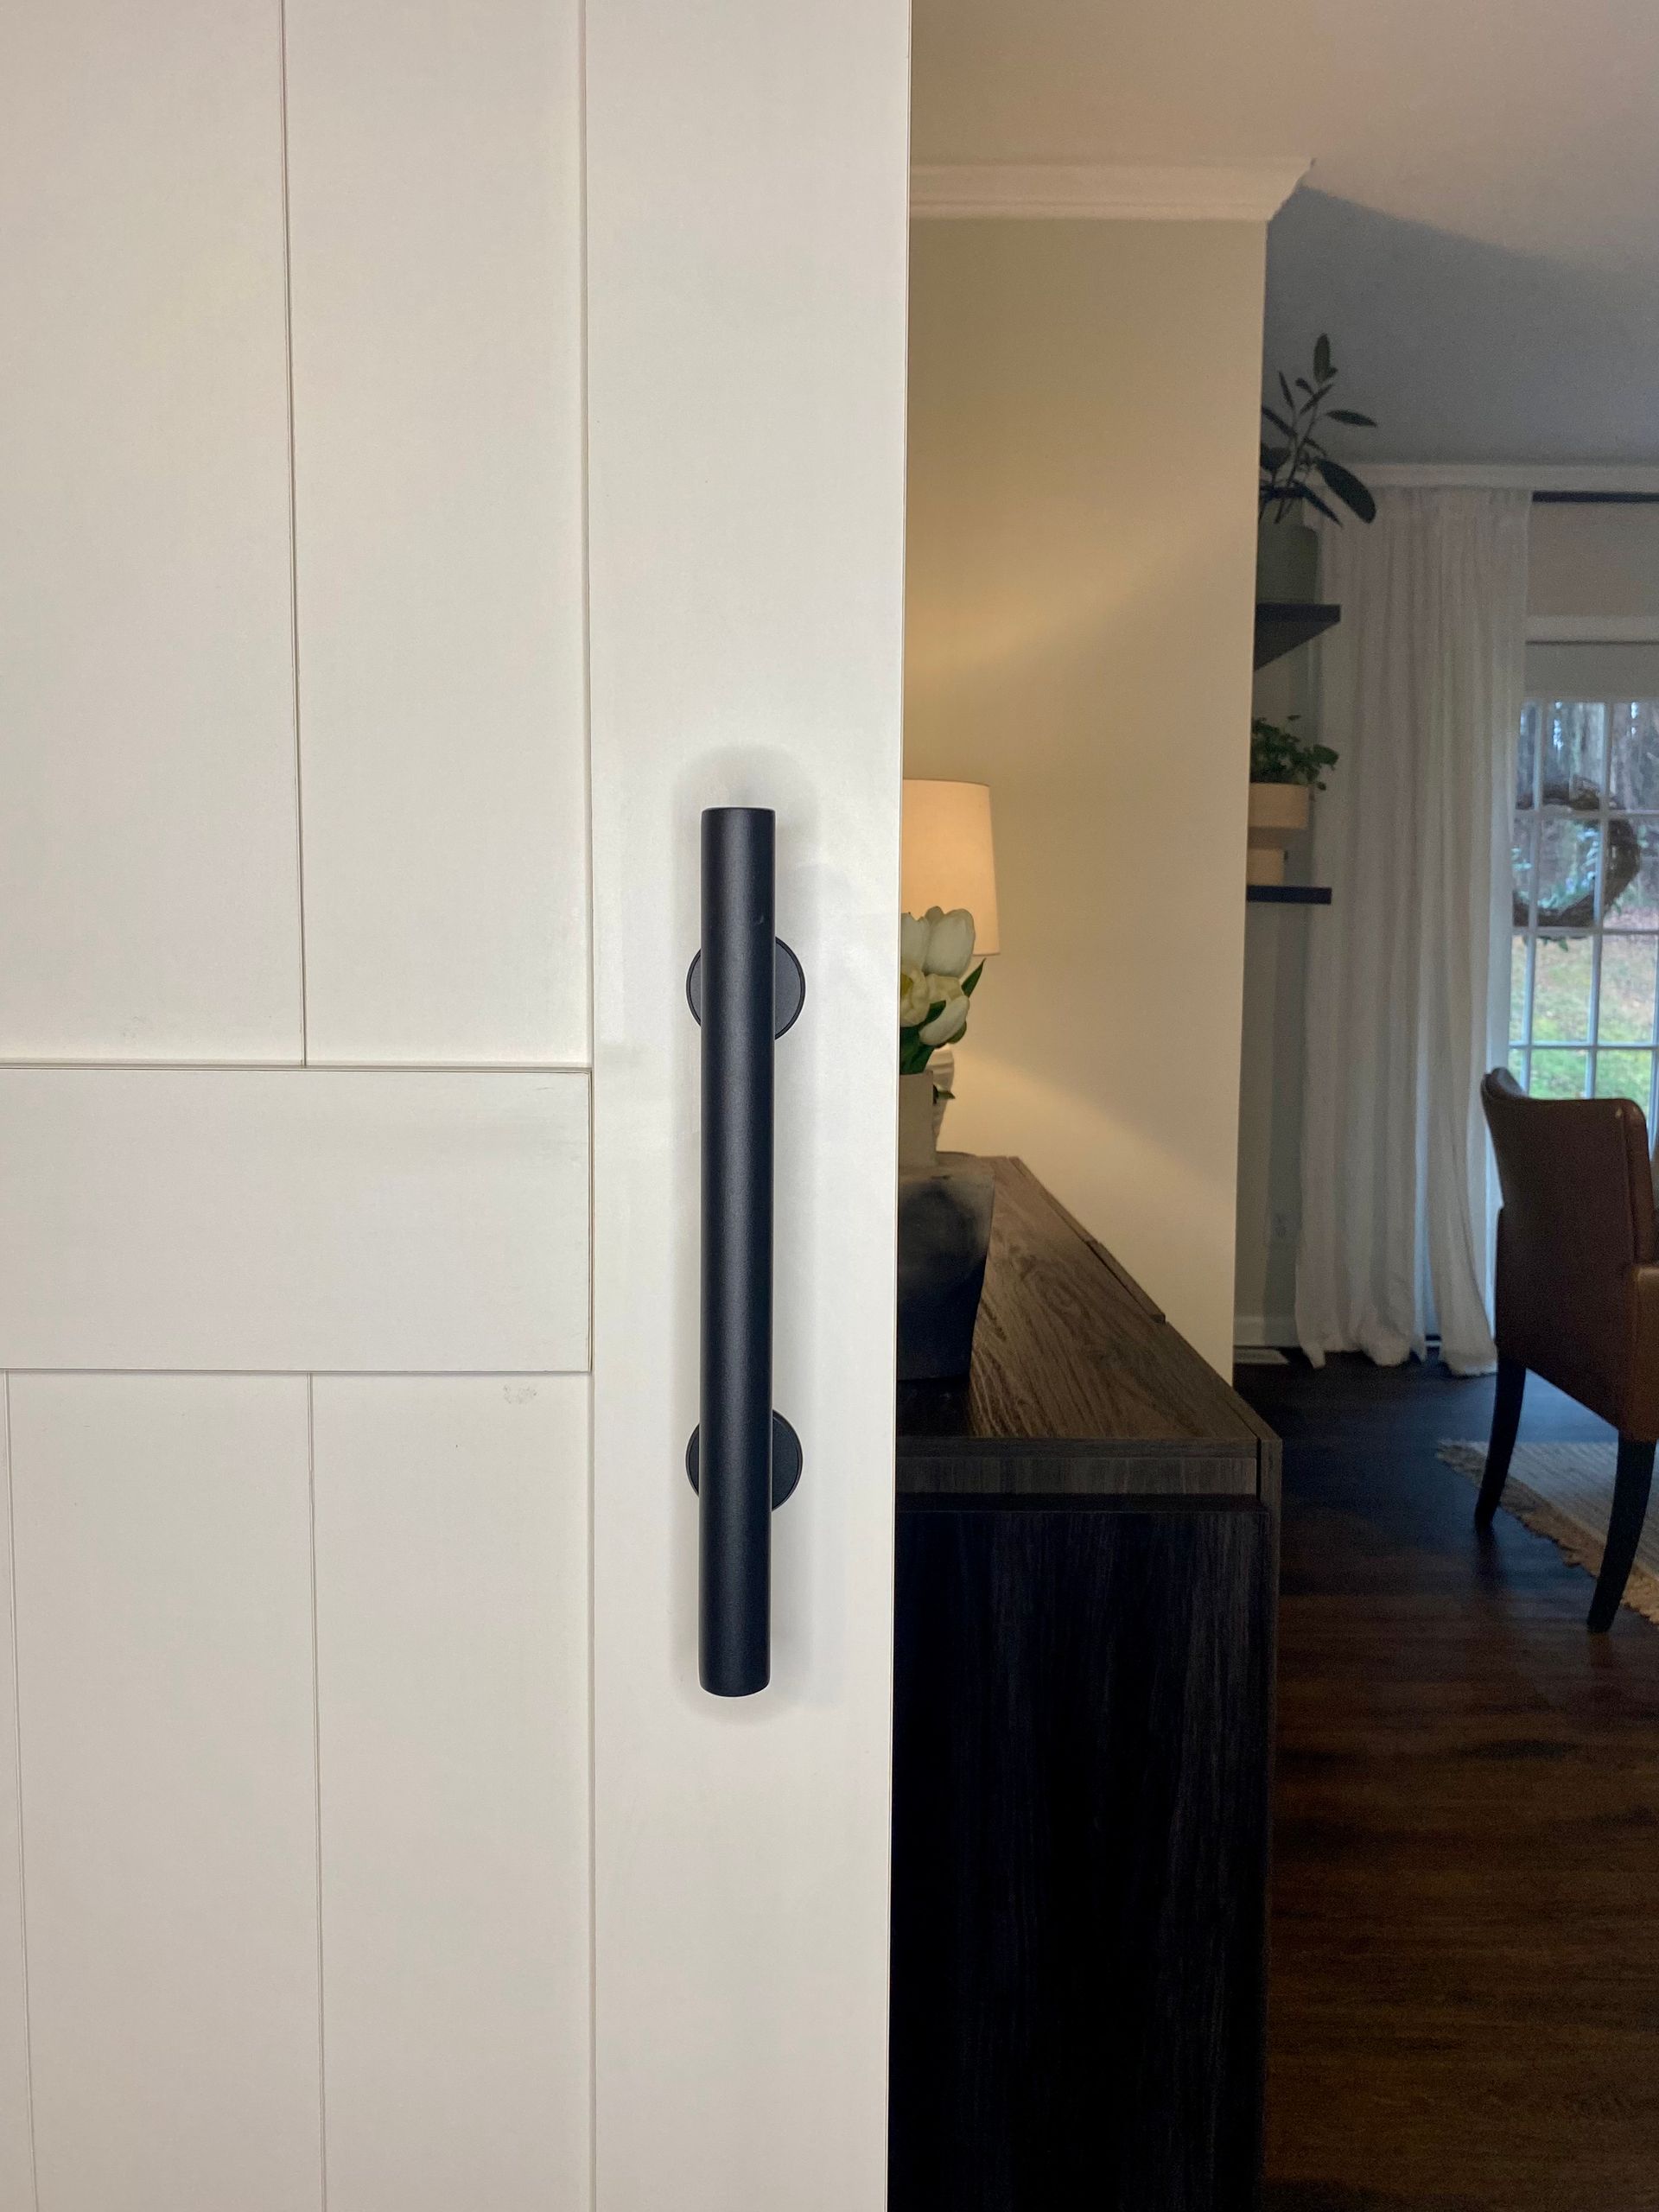
6) Install Door Handle and Bottom Door Track
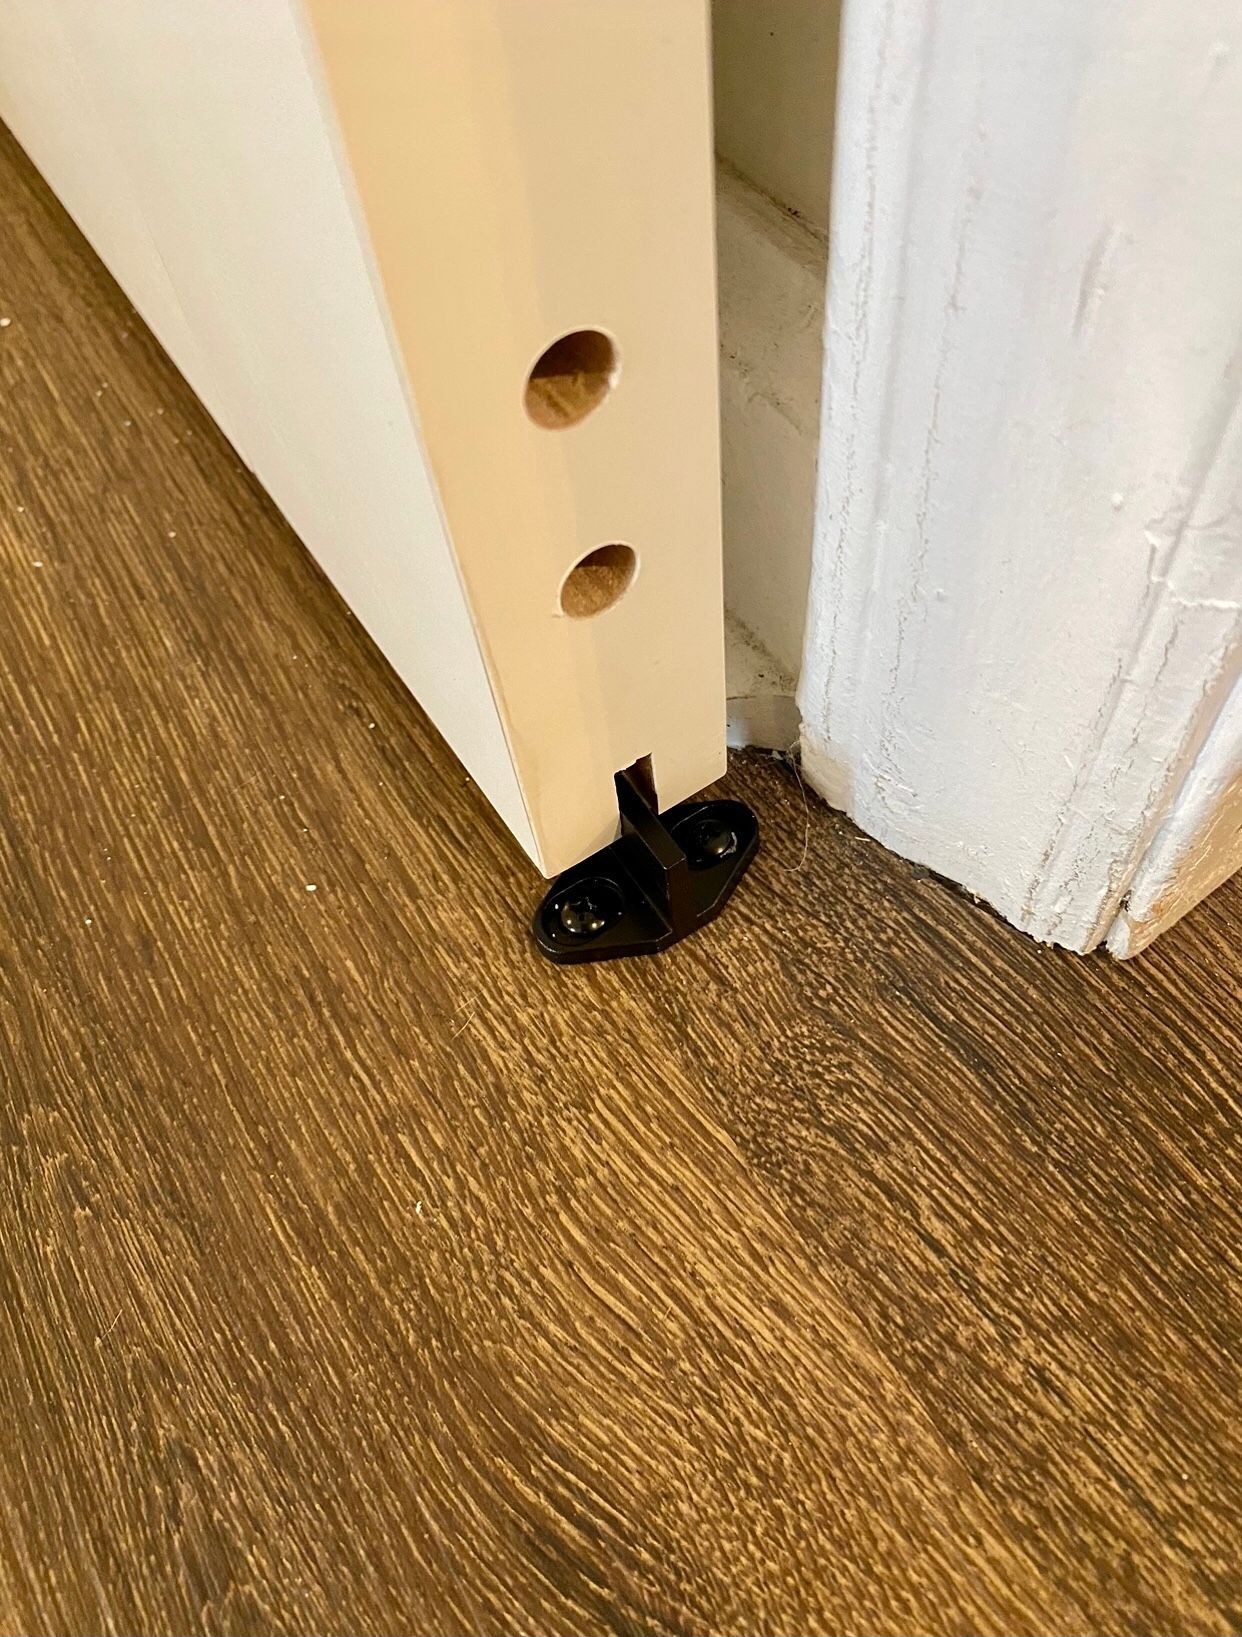
- Our sliding barn door came with two handles and a bottom door track. I recommend finding a hardware kit that includes all of this! The double sided handles allow you to open and close the door from either side of the room. The bottom door track is the secret VIP of this project and let me explain why. The biggest complaint I hear about barn doors is how they come off the track and are a pain to open and close. I can guarantee none of those people installed their bottom door track! We screwed this small track at the edge of our door trim and it keeps the sliding door in a straight line. We have yet to have our door fall off the track! Although it may be scary to drill the track into your flooring, I promise it will be worth it! We tested spots to put this track several times and settled on the edge of the trim because it stays in the door whether opened or closed. Here is a close up of this bottom door track and please excuse my dusty trim. You can also see from this photo how adding the support board gives our barn door clearance over the existing trim! I will fill in these holes later when I repair the trim.
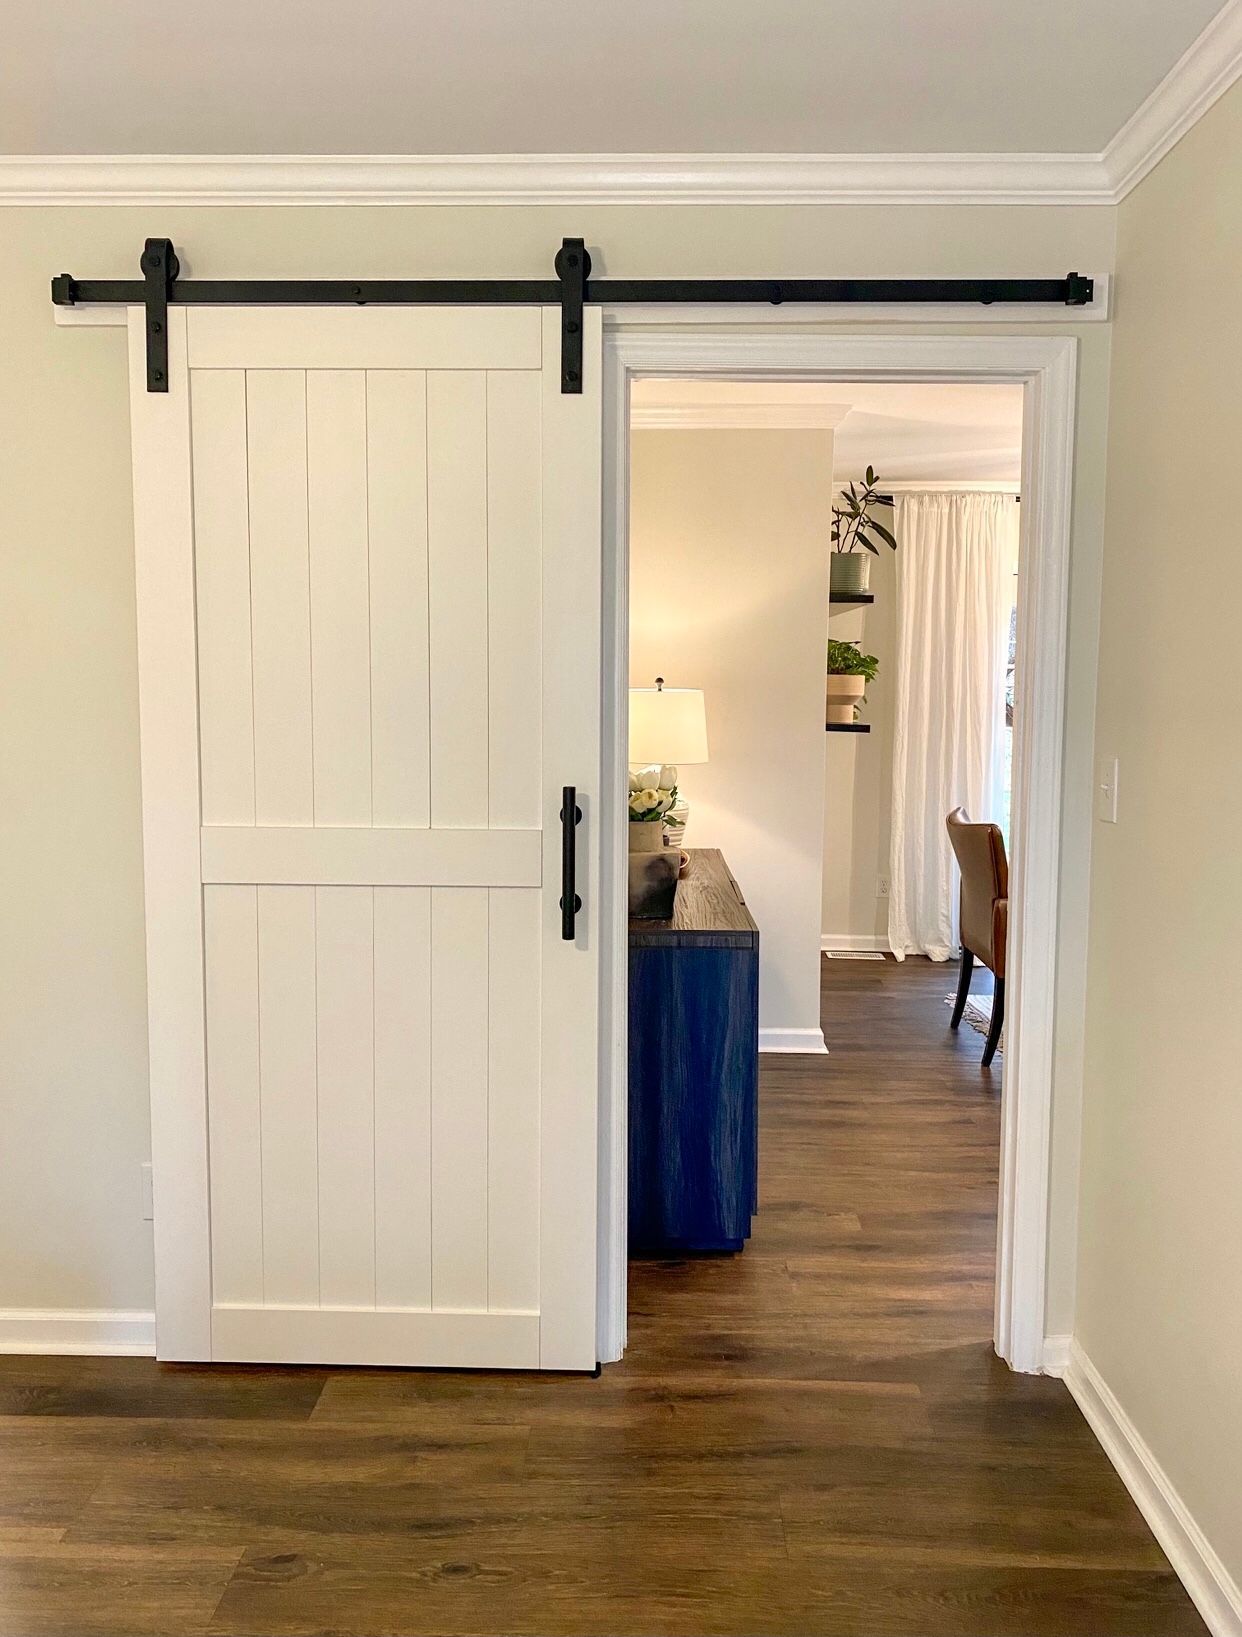
Okay, friend, now step back and admire your hard work! If you followed this tutorial you should have been able to successfully install your sliding barn door without removing trim in a few hours. Talk about being productive, and you completed a DIY installation in only 6 steps! I love projects that are simple, yet make a huge impact on home design and this barn door did just that. Check out photos below of the finished product!


Popular Questions About DIY Installation of Sliding Barn Door Without Removing Trim:
- What was your overall cost?
-$320! Our only cost was to purchase the barn door and hardware kit which made this project very affordable! There are several more budget friendly barn door options online, or you can always build your own door. We wanted a quality, sturdy door that would withstand any pawing by our dog or chaos with future children so we chose to go with a middle price point. You can spend thousands on a high end barn door too, so there truly are options for any budget with this project!
-Your cost will be higher if you need to purchase any of the tools on my supply list at the beginning of this blog, so plan accordingly!
- Does your barn door offer the same privacy as a traditional door?
- The simple answer is no. We knew we would be losing some privacy when we chose to leave our existing trim because the barn door cant sit flush with the trim. We have about a 1/4 inch gap around the entire door, so you do not get the same privacy a traditional door provides. For us, we weren't worried about a small gap around our door as we only shut it at night.
- Do you have issues with your barn door jumping off the track or falling on the ground?
-Thankfully, no! I attribute our fortune to the bottom door track I described in step 6. We are actually going to order an additional one to place at the end of the track for better stability later down the road, but we haven't had a single incident of this so far!
Do you have any questions about my tutorial or our DIY process? Any feedback on our doorway transformation? Please leave a comment and find my DIY page on instagram @thehouseofwatson to find reels and more behind-the-scenes of each project I complete! This is a brand new blog and I'm just a girl chasing her dreams, so I would love to have your support. Follow, subscribe and feel free to send any questions you may have about your own projects. I am so happy you are here and remember.... if I can complete a project, so can YOU!